
Let’s get to it!
Today is the release date of The Quarry, a narrative horror adventure title from Supermassive Games that you can’t miss! If you have been following this developer closely, you might have played their The Dark Pictures Anthology saga – of which there are still more games to come! We also have Quantum Dream that has given us games like Detroit: Become Human recently but, what if we told you that you can create a custom collection for this kind of games yourself?
In this guide you will find all the necessary steps to create the best collection possible
– tailored to your community.
The first thing we need to do is to install the game that we want to play with Dixper. – Yes, this step is really useful for any game or collection you want to make. We have to open it, configure its graphic options -as any streamer usually does before launching a game-, and above all, test that it synchronizes correctly with Dixper. -This step is crucial before starting to create a collection for our community.
Now go to the game-control settings, remember these games are all about making choices to get to the end, so it’s really fun to enable your community to make that decision. How about a “Pick my next choice in the game?” Skill. We could, but no. We’re on Dixper! We can give our viewer the opportunity to directly press our key in the game. Hence why we need to know all the keys that are used. In order to do that, we have to open the controls settings of the game and look at the keyboard command controls.
In our case, we are going to use The Dark Pictures Anthology: Man of Medan title, also by Supermassive Games, as an example, in case you want to follow the steps with us, try it with Dixper and replay it before the release of The Quarry. Don’t tell me you don’t want to experience what would happen if your community were to choose your fate in the game?
So, let ‘s focus – back to the keyboard controls configuration. Write down all the keys you want your community to be able to press. Let’s make a collection that works for both the keyboard and the controller:
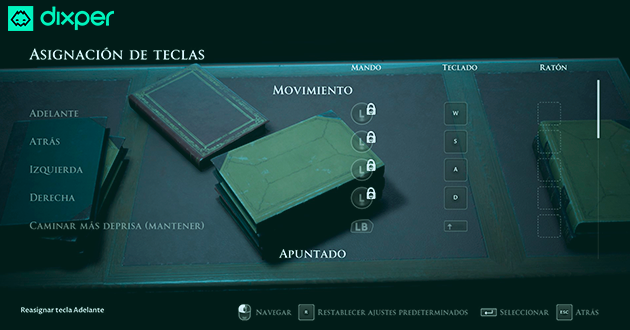
Make a list like the following one according to the game and the most interesting shortcuts you can find:
- DPad and Left Joystick: Allows the character’s movement (direction AWDS in case of using the keyboard).
- Right Joystick: Decisions, aiming and other movements (Arrows in case of using keyboard)
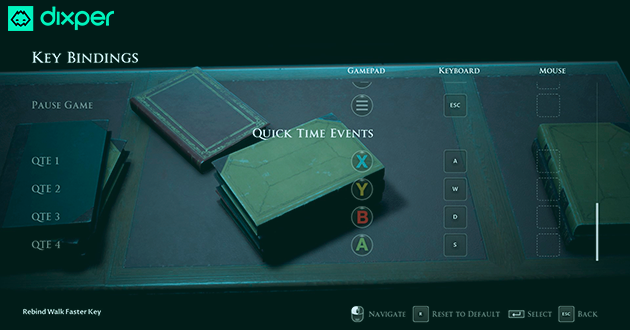
- Start button: Pauses the game (ESC on a keyboard).
- Back button: Opens the menu (Tab key on keyboard).
- LB: Walk fast. (Shift in keyboard)
These games usually use Quick Time Event mechanics, that is, you will have to press a button unexpectedly and very quickly in the middle of a scene. Very important to take them into account:
- QTE: XYBA on the controller (AWDS on keyboard).
At this point, I’ll let you in on a secret: even if you use a controller to play, sometimes adjusting keyboard locks or keystrokes is the best option to ensure everything works properly. And that’s why we will try to explain to you how to do it in the controller and how to do it on the keyboard.
It’s Dixper time!
Let’s go to “My collections” in the left menu and once inside, click on create collection.
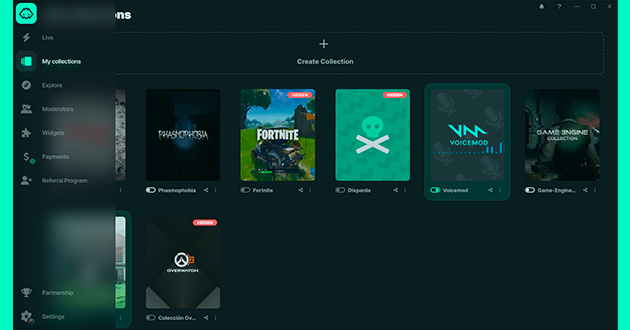
We will see two options, “Create collection” and “Create collection from game”, in this case we are only interested in the first one (the second option is Dixper’s collections’ library). We should see this image:
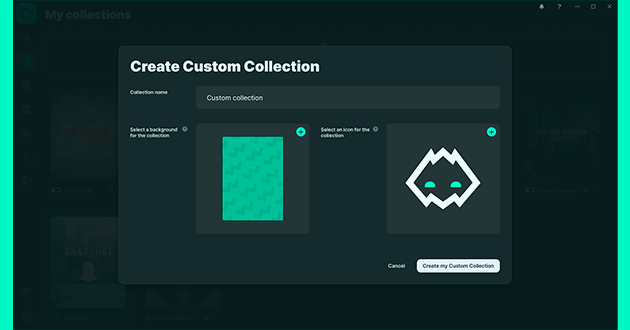
Here we can change the collection’s name, which we highly recommend for easier location within your collections. We can also modify the background and logo options, but we’ll leave that for later.
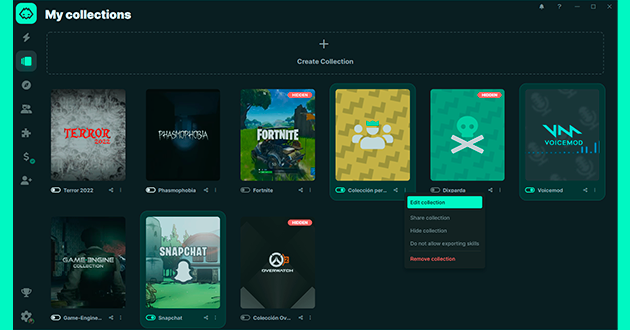
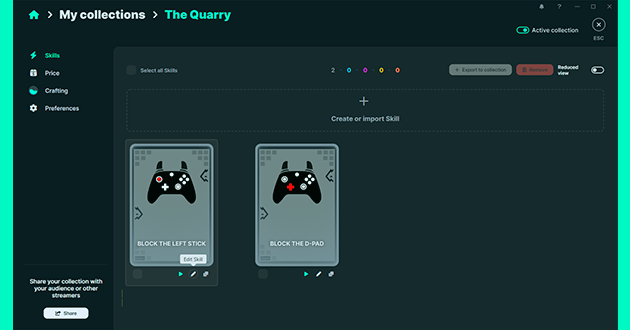
After creating the new collection, it will appear in “My collections”, now just click on the three dots in the lower right corner of the collection display and click on “Edit Collection”:
Now we’re inside of our empty collection. On the left we see the collection’s configuration panel: here we can modify the skills, price, preferences and crafting options. Don’t be afraid to click on them and see all the possibilities that Dixper offers you. We won’t expand on these editable options in favor of what is most important.
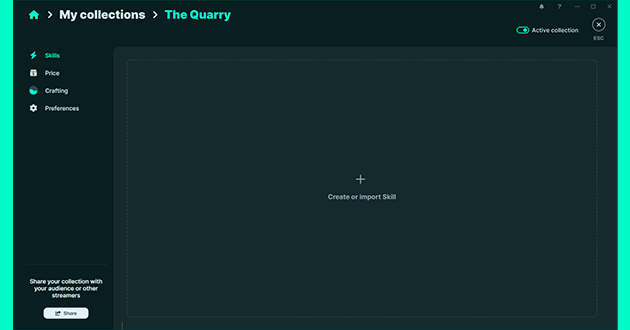
We are going to create our first Skill for the collection.
We’ll start by locking our left D-pad, the left joystick, as well as the AWDS keys that correspond to the movement of the character on the keyboard. These keys are also useful for Quick Time Event moments, but we recommend that this Skill be for type: “I can’t move the character” and for you to create another one to block the Quick Time Events, to have a more specific skill for that purpose.
Click in the center on “+Create or import Skill”, the following window will open.

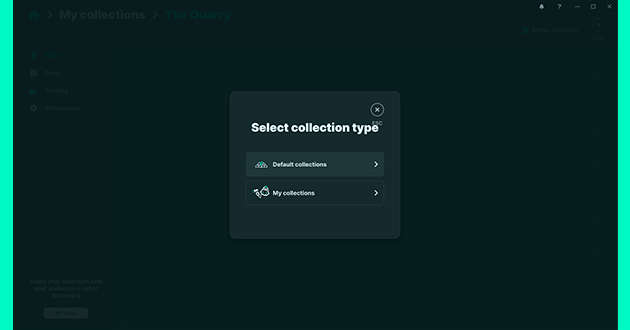
Here you can create the Skill from scratch, in “Create Custom Skill”; Or to make it easier for you, Dixper has at your disposal a library of collections that you can export to serve as an example. And this is the one we are going to use to show you. So, go to “Import Skills from other collections”, now a second window will open that gives us the choice between our own collections or Dixper’s – we’ll use the latter.
Next, we’ll look for the Basic Controller collection and select it. Easy, isn’t it? You can skip this step if you are able to customize your collection in an advanced way, but it never hurts to have an example to guide us, right?
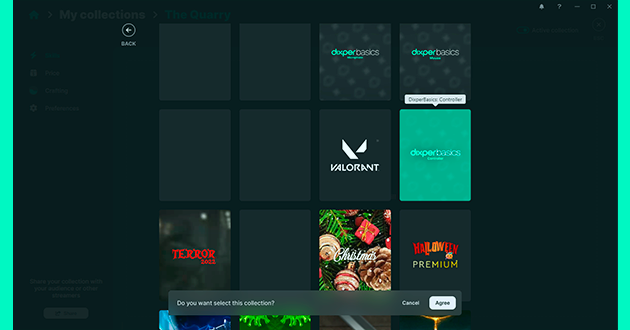
Now we are going to select the Skills from the Basic Controller collection that we are interested in to use as an example. We choose the one that blocks the left joystick and also the crosshead (you’ll understand later why). When you have the Skills in your customized collection, go to the pencil of the Skill that “blocks the Joystick” in its inferior part and we will access the Skill’s editing panel.
What about those who are going to play only with a keyboard? Don’t worry, for the controller version, it is also advisable to block the corresponding ASWD keys, and that the streamer who plays with the controller, does not cheat and use the keyboard to escape from the blockage. This way, we kill two birds with one stone and those who play with the keyboard, should just ignore the controller explanations. Although it doesn’t hurt to do it anyway.
And for this reason, we must also export -if we want to have it as an example-, the Skill that blocks the ASWD keys from the Dixper Basics’ Collection. The procedure to export it is the same as the one used in the previous step. This way, we will have an example of each action that we want to add to our Skill. But as we said before, you can skip this step if you are already familiar with the Dixper Skills editing tool.
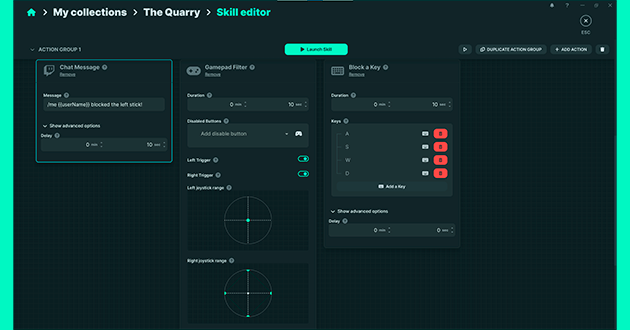
Let’s return to the Skill that we wanted to edit “lock the Joystick” and look at the example:
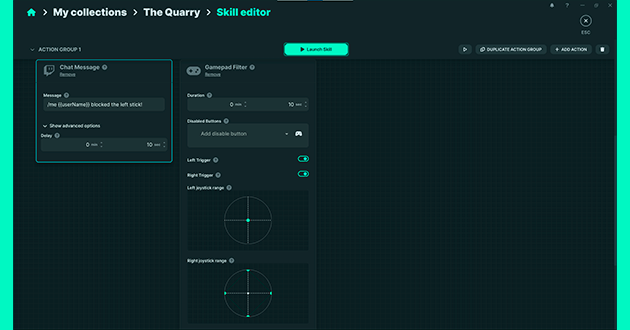
We have two actions within group 1. One is “Send message to chat” and the other is “Block controller”. As the action is already prepared, we do not have to do much more beyond modifying the duration time of the skill to our liking. And so it can serve as a base skill.
In this example, the duration is 10 seconds. We recommend that if you increase the time for which the blocking will last, keep in mind that the default Twitch clips only last a maximum of 30 seconds. At the same time, it would not make sense to block for less than 10 seconds, since we must leave enough time between the launch of the skill, plus the streaming’s delay, to the fact that the streamer may not press any key for a long time. That’s why we have to teach our viewers to catch the best timing for launching skills according to our content. But we will leave these tricks for another guide.
Do not forget to deploy the advanced options, which grant the possibility to add delay to the chat message. It is recommended to set it when the blocking ends. In this case it is 10 seconds, to avoid chat spoilers beforehand, but this is up to each individual! And thanks to the fact that we have exported the example skill; we already know how the command of the messages in the chat goes. However, in the question mark that appears in each action module we always have the explanation of everything we need to edit.
The logical thing is that if we block the joystick so that you, as the streamer, cannot move, you are also not allowed to use the joystick, or the corresponding arrow keys in the game that cause the temptation to cheat. If you are extremely noble, you may be able to skip this step. But we want to show all the options, so let’s make the Skill as complete as possible.
Look at the keyboard lock skill for example:

We have to apply these actions to our main Skill that we have chosen, in this case the “joystick lock”. You will have concluded that it doesn’t make sense to have the three options separately. And that is why we’re taking this step, so that you learn how you can use the collections already created to serve you as a base to make your own. Of course, it would be great if we could merge two Skills, as in this case, so that the groups of actions of both skills are unified, and we only have to edit the final details. But, while this is not possible yet, the idea is there.
Let’s return to the main Skill, “lock joystick”, that we have taken as a base, and there we are going to add the action of “Lock keyboard” that we have seen in the exported example. Yes, we already know! We could have directly given you the example of the skill in this guide, but we want you to learn how to use the interface to be able to deal with anything you might come up with (starting from our collections).
Well, in case you get lost, I’ll help you a little. In the group of actions 1 of the editing panel of the Skill base “Lock joystick”, let’s click on the “add action” button. We will get a new window with multiple options, and we’ll choose keys.
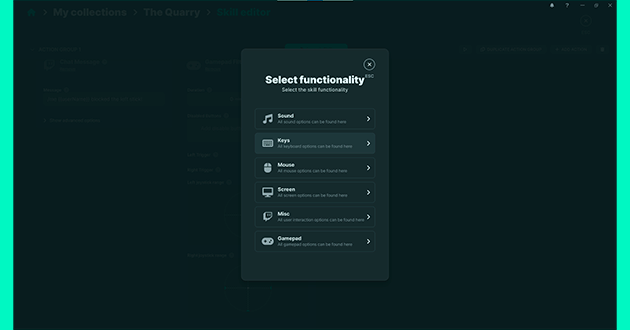
Then you will get another screen and that is where you will see the option we were looking for “lock keyboard”, select it:
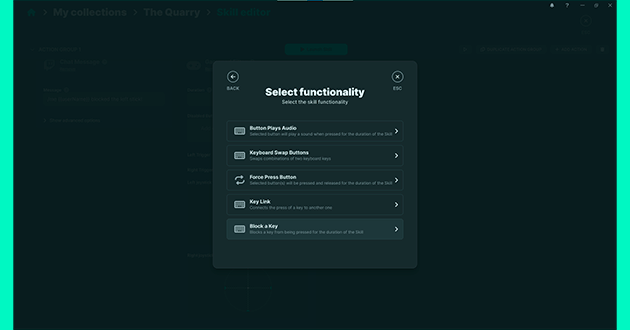
Now we only have to apply the arrow shortcuts to the new action module that we have just added. It is very simple, just click on the box and when the “stop recording” message appears, press the key you want to record, in this case, we can start with the “A” key. Then you should repeat the process three more times, clicking on the “add key” button to do the same with the other missing keys, and as a result; you should be left with something like this:
As a recommendation, it would not be a bad idea to start testing in any simple and fast game in which the action modules that we have applied work correctly, and we advise you to do it one by one to verify that all the customized actions work.
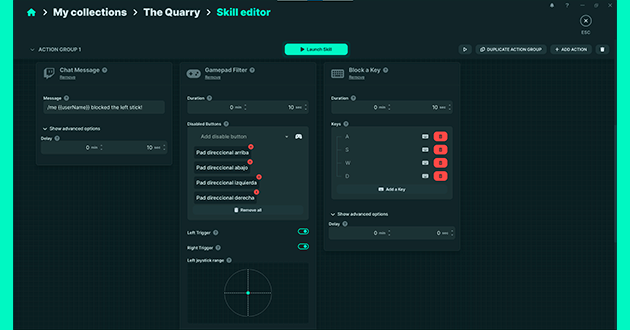
We already have locked the left joystick and the ASWD keys in the same group of actions. The only thing left to do is to lock the joystick’s D-pad. We can repeat the same steps that we have used previously to create the one to block the keyboard. We see the example of the Skill that we have exported, we go to our base Skill and click on Add action > Controller > Lock controller, but… we already have in sight an action of “Lock controller” that we have used only to lock the joystick. Attention! And in this same option we can add shortcuts to also lock the D-pad. So, let’s get to it.
In the “lock controller” action module that we already have, you will see a section where it says “disable buttons”, there you have it. You only have to select the buttons that you want to disable in the controller when you launch this skill. That’s it! How easy! Click on select and put the directional pad on top, and repeat the process with each direction.
And this should be the final result of our Skill:
Now you can delete the Skills that we had only exported to serve as an example.
But wait! Our Skill is not yet fully completed. Remember that you must check the basic options of the Skill. That is to say, give it a name, a description, additional instructions -we recommend that in the “description” section, you fill in the information of how you want your spectators to use that skill, this way you may save yourself from returning some that did not work because they were cast when they were not meant to-, you must also adjust the rarity, the enchant and disenchant points, and the reuse time of that Skill that are in the advanced settings. Oh! – and you can also modify the preview of the Skill, but we do not recommend moving images, it slows down the loading of the collection on the web for the viewer and causes a noisy visual effect if you do not control it properly.
We will not dwell on the basic settings of the skill, if you want, but what we do want to recommend at this point is that you try the skill in the game. In particular, in this game, at the beginning, there is a tutorial on how the mechanics that you will use throughout the game work. And right on that screen, you will be able to devise all the skills for the entire game that you need and test them whenever you want. That’s just the cumbersome part of it all. Repeating over and over again the scene to make sure that all the skills work correctly. And you’ll have to do the same thing when you finally get The Quarry.
Now it’s time to add more skills to the collection!
Following the tips we have given you with the example of creating this Skill, plus; knowing the controls we pointed out at the beginning, you should already be an expert in the creation of skills and have enough ideas to complete your collection. Now you just need to think a little more to adjust the Skills to your community.
We recommend you to continue using Dixper Basics to add some Skills that have to do with the game controls and we remind you that for the controller there are no keystrokes in Dixper Studio, only locks. For example, to press “Y” what we should do is press the corresponding key on the keyboard, in the example of the game we have chosen for this collection, it would be the “W”.
For this kind of game, you can also add some jumpscare Skills. You can find examples in our Horror, Jumpscares or Halloween collections. Export the Skill to use as an example as we have shown you previously and venture into changing the image of the jumpscare or the sound. Don’t forget that we are not responsible for any right-infringement in your creations.
You can also take advantage of the Roleplay collection for this kind of games, since it is designed to set the mood and interfere as little as possible with the scenes, giving the possibility that the spectator sends us ‘raise your hand’ skills or the rain effect in our game for example.
On the other hand, you can also create an infinite number of “Just Chatting or challenge” style Skills, that is to say, you can create the typical “kill a character” skill, or one along the lines of: “while this image is being shown on the screen -insert an image of your choice in the skills edition with the desired duration-, you must play standing up. How cool is this idea?! We already warned you that you can do a lot with Dixper, it’s just a matter of using your imagination and daring to play with the skill creation tools we provide you with.
In addition, you can use the rest of the actions such as the possibility to create a raffle, give away boxes, disenchant Skills, create random chat messages -generating several action groups-, a sound with each key press, etc. Have fun and customize according to your streaming theme!
Finally, it never hurts to activate the Dixper Basics Microphone collection at the same time and make a Snapchat collection, as we recommend in this guide, to get great combos. Or on the other hand, you can leave only this collection active and enable that only one skill can be launched, to live a different experience with Dixper and the game. It all depends on how you want to focus it for your community. Of course, don’t forget to warn your spectators that for the Quick Time Event in these games, they must be the fastest in the West! Luckily, if they fail with the timing, we can always return the skill.
However, because we care so much about you, our Ambassador Ardashe, has come up with a sample collection for you to edit to your liking and have as an inspiration to finalize this collection. She has used Dixper’s tools and with the help of external image and video editors, she has completed this collection, which you can do for any game you can think of that allows you to use Dixper!
And as always, if you have any doubts, the community and the Dixper team can help you from the Discord with your creations. Don’t forget to share with us your experience with the collection creator and your final result! We are looking forward to seeing your ideas!